这是我博客 Blog 的地址 和 Github Repositroy。
本博客是用Hugo 来生成静态网站。 Hugo GitHub
并通过 GitHub Action 来自动化部署到 GitHub Pages。
搭建步骤#
创建代码仓库#
首先按照文档创建 GitHub Pages 站点。该仓库可见性必须是 Public。
另外创建一个仓库用来存放 Hugo 的源文件,名称随意,这里假设仓库名叫 .github.io.source。建议将仓库可见性设置成 Private 以保护好你的源代码。
创建完毕后你的账户下将存在以下两个代码仓库:
生成Hugo 网站#
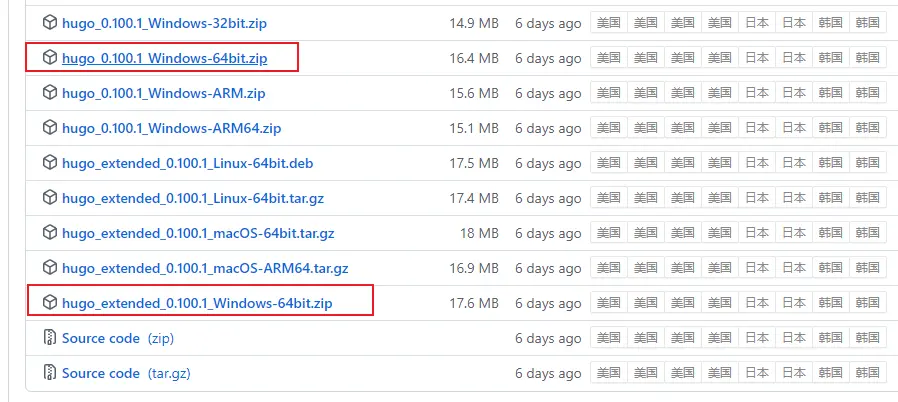
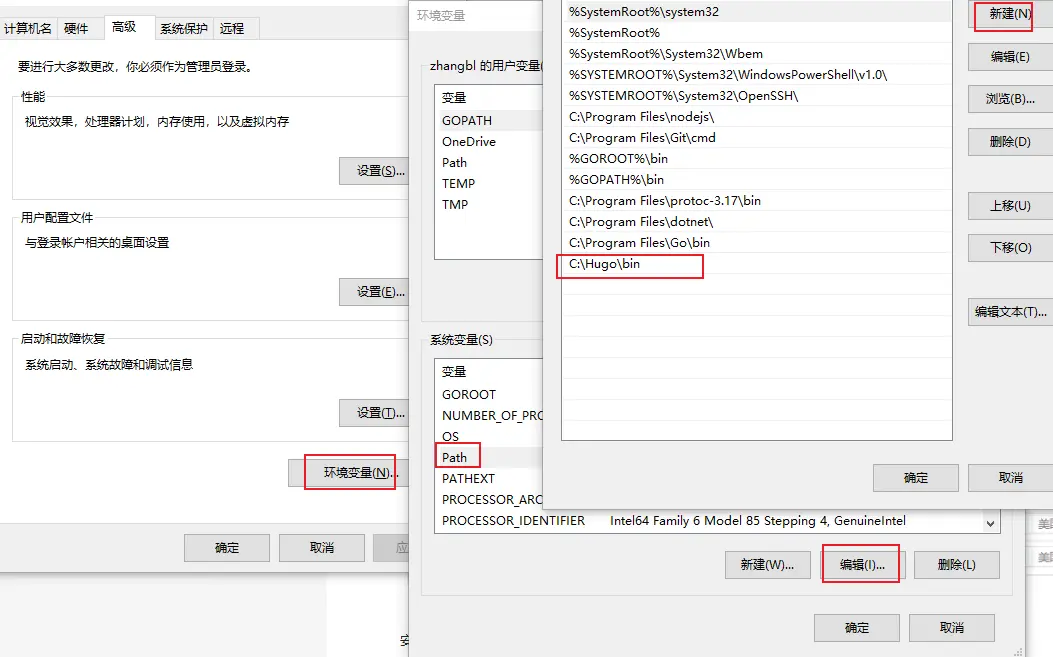
安装Hugo#
Hugo 生成网站#
在/c/Hugo/sites 目录下使用命令hugo new site siteName生成网站
1
| hugo new site hello-hugo
|
执行成功后,Hugo 会给出温馨的提示:
Just a few more steps and you’re ready to go:
Download a theme into the same-named folder.
Choose a theme from https://themes.gohugo.io/ or create your own with the “hugo new theme ” command.
Perhaps you want to add some content. You can add single files with “hugo new .”.
Start the built-in live server via “hugo server”.
先看看执行完 hugo new site 命令后,Hugo 为我们做了什么。
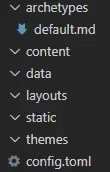
进入 hello-hugo 目录,Hugo 生成的内容如下图所示:

这些大致作用如下:
- archetypes:存放博客的模板,默认提供了一个 default.md 作为所有博客的模板。
- data:存放一些数据,如 xml、json 等。
- layouts:与博客页面布局相关的内容,如博客网页中的 header、footer 等。
- static:存放静态资源,如图标、图片等。
- themes:主题相关。
- config.toml:站点、主题等相关内容的配置文件,它支持 yaml、toml 和 json 格式,后续将会一直和这个文件打交道。
建议config.toml 改为config.yaml 语法看着更舒服点。
Hugo 主题使用#
根据提示,要使用 Hugo,我们必须先下载 主题,这里我选择自己比较喜欢的 PaperMod。
根据文档安装 hugo 主题。
文档提供了三种方式,建议使用第一种或者第二种。
安装主题之后,在项目 theme 文件夹下生成了主题名称的文件夹。
1
2
3
4
5
6
7
8
9
| PS C:\Hugo\sites\Reid00.github.io.source\themes> ls
目录: C:\Hugo\sites\Reid00.github.io.source\themes
Mode LastWriteTime Length Name
---- ------------- ------ ----
d----- 2022/6/6 19:39 PaperMod
|
建议修改archetypes/defeault.md, 以后hugo new post/1.md 新建文档的时候就会使用改模板
 1
 2
 3
 4
 5
 6
 7
 8
 9
10
11
12
13
14
15
16
17
18
19
20
21
22
23
24
25
26
27
28
| ---
title: "{{ replace .Name "-" " " | title }}"
date: {{ .Date }}
lastmod: {{ .Date }}
author: ["Reid"]
categories:
-
tags:
-
series:
-
description: ""
weight: # 输入1可以顶置文章,用来给文章展示排序,不填就默认按时间排序
slug: ""
draft: false # 是否为草稿
comments: true
showToc: true # 显示目录
TocOpen: true # 自动展开目录
hidemeta: false # 是否隐藏文章的元信息,如发布日期、作者等
disableShare: true # 底部不显示分享栏
showbreadcrumbs: true #顶部显示当前路径
isCJKLanguage: true
cover:
image: ""
caption: ""
alt: ""
relative: false
---
|
修改项目配置config.yaml#
我的配置如下:#
  1
  2
  3
  4
  5
  6
  7
  8
  9
 10
 11
 12
 13
 14
 15
 16
 17
 18
 19
 20
 21
 22
 23
 24
 25
 26
 27
 28
 29
 30
 31
 32
 33
 34
 35
 36
 37
 38
 39
 40
 41
 42
 43
 44
 45
 46
 47
 48
 49
 50
 51
 52
 53
 54
 55
 56
 57
 58
 59
 60
 61
 62
 63
 64
 65
 66
 67
 68
 69
 70
 71
 72
 73
 74
 75
 76
 77
 78
 79
 80
 81
 82
 83
 84
 85
 86
 87
 88
 89
 90
 91
 92
 93
 94
 95
 96
 97
 98
 99
100
101
102
103
104
105
106
107
108
109
110
111
112
113
114
115
116
117
118
119
120
121
122
123
124
125
126
127
128
129
130
131
132
133
134
135
136
137
138
139
140
141
142
143
144
145
146
147
148
149
150
151
152
153
154
155
156
157
158
159
160
161
162
163
164
165
166
167
168
169
170
171
172
173
174
175
176
177
178
179
180
181
182
183
184
185
| baseURL: "https://reid00.github.io/" # 绑定的域名
languageCode: zh-cn # en-us
title: "Reid's Blog"
theme: PaperMod # 主题名字,和themes文件夹下的一致
enableInlineShortcodes: true
enableRobotsTXT: true # 允许爬虫抓取到搜索引擎,建议 true
buildDrafts: false
buildFuture: false
buildExpired: false
enableEmoji: true # 允许使用 Emoji 表情,建议 true
pygmentsUseClasses: true
googleAnalytics: UA-123-45 # 谷歌统计
Copyright:
hasCJKLanguage: true # 自动检测是否包含 中文日文韩文 如果文章中使用了很多中文引号的话可以开启
paginate: 10 # 首页每页显示的文章数
minify:
disableXML: true
# minifyOutput: true
defaultContentLanguage: en # 最顶部首先展示的语言页面
defaultContentLanguageInSubdir: true
languages:
en:
languageName: "English"
weight: 1
taxonomies:
category: categories
tag: tags
series: series
menu:
main:
- name: Archive
url: archives
weight: 5
- name: Search
url: search/
weight: 7
- name: Categorys
url: categories/
weight: 10
- name: Tags
url: tags/
weight: 10
outputs:
home:
- HTML
- RSS
- JSON
params:
env: production # to enable google analytics, opengraph, twitter-cards and schema.
description: "Reid's Personal Notes -- https://github.com/Reid00"
author: Reid
# author: ["Me", "You"] # multiple authors
defaultTheme: auto
# disableThemeToggle: true
DateFormat: "2006-01-02"
ShowShareButtons: false
ShowReadingTime: true
# disableSpecial1stPost: true
displayFullLangName: true
ShowPostNavLinks: true
ShowBreadCrumbs: true
ShowCodeCopyButtons: true
ShowRssButtonInSectionTermList: true
ShowLastMod: true # 显示文章更新时间
ShowToc: true # 显示目录
TocOpen: true # 自动展开目录
comments: true
images: ["https://i.loli.net/2021/09/26/3OMGXylm8HUYJ6p.png"]
# profileMode:
# enabled: false
# title: PaperMod
# imageUrl: "#"
# imageTitle: my image
# # imageWidth: 120
# # imageHeight: 120
# buttons:
# - name: Archives
# url: archives
# - name: Tags
# url: tags
homeInfoParams:
Title: "Hi there \U0001F44B"
Content: >
Welcome to My Blog.
- **Blog** 是我个人的一些笔记
- 包含Go, Python, 机器学习, KV 存储引擎的一些相关笔记, 方便以后复习
- [GitHub主页](https://github.com/Reid00)
socialIcons:
- name: github
url: "https://github.com/Reid00"
- name: twitter
url: "https://twitter.com"
- name: RsS
url: "index.xml"
# editPost:
# URL: "https://github.com/adityatelange/hugo-PaperMod/tree/exampleSite/content"
# Text: "Suggest Changes" # edit text
# appendFilePath: true # to append file path to Edit link
# label:
# text: "Home"
# icon: icon.png
# iconHeight: 35
# analytics:
# google:
# SiteVerificationTag: "XYZabc"
# assets:
# favicon: "<link / abs url>"
# favicon16x16: "<link / abs url>"
# favicon32x32: "<link / abs url>"
# apple_touch_icon: "<link / abs url>"
# safari_pinned_tab: "<link / abs url>"
cover:
responsiveImages: false # 仅仅用在Page Bundle情况下,此处不讨论
hidden: false # hide everywhere but not in structured data
hiddenInList: false # hide on list pages and home
hiddenInSingle: false # hide on single page
# fuseOpts:
# isCaseSensitive: false
# shouldSort: true
# location: 0
# distance: 1000
# threshold: 0.4
# minMatchCharLength: 0
# keys: ["title", "permalink", "summary", "content"]
markup:
goldmark:
renderer:
unsafe: true
highlight:
# anchorLineNos: true
codeFences: true
guessSyntax: true
lineNos: true
noClasses: false
style: monokai
privacy:
vimeo:
disabled: false
simple: true
twitter:
disabled: false
enableDNT: true
simple: true
instagram:
disabled: false
simple: true
youtube:
disabled: false
privacyEnhanced: true
services:
instagram:
disableInlineCSS: true
twitter:
disableInlineCSS: true
|
新建hugo 网页#
这时候主题已经激活了,我们先往博客中添加一篇文章,hugo new post/first.md:
1
2
| hugo new post/first.md
hugo new post/second.md
|
此处观看content 目录,会生成posts 文件夹
 1
 2
 3
 4
 5
 6
 7
 8
 9
10
11
12
13
| PS C:\Hugo\sites\Reid00.github.io.source\content> tree /F
文件夹 PATH 列表
卷序列号为 E2D5-548C
C:.
│ archives.md
│ search.md
│
└─post
4th.md
first.md
second.md
test.md
third.md
|
另外要使用 Archive 和 Search,需要进行以下操作:
查看网站效果:#
在项目目录c/hugo/sites/projectName 目录下输入hugo server -D
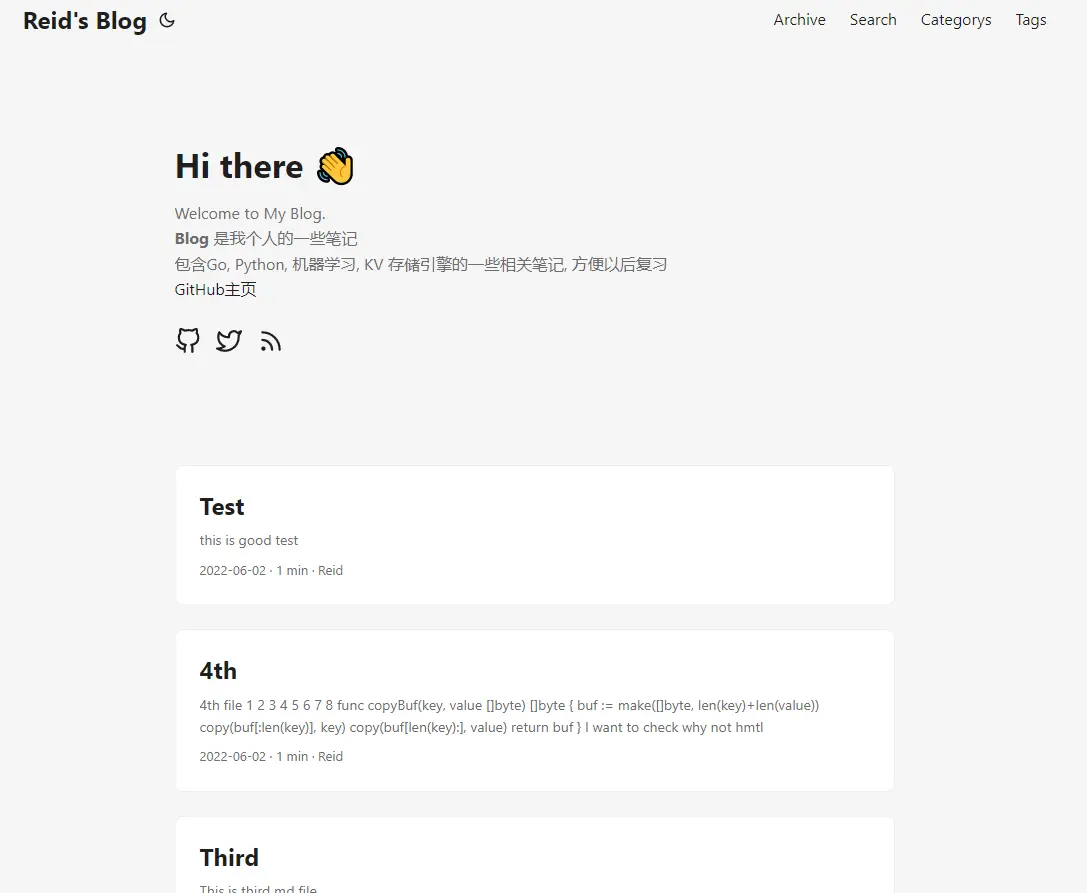
看到一下输出, 表示可以访问 http://localhost:1313/ 查看效果,如果有其他不满意的地方,可以自行查找其他资料修改配置。
1
2
3
4
5
6
7
8
9
10
11
12
13
14
15
16
17
18
19
20
21
22
| Start building sites …
hugo v0.100.0-27b077544d8efeb85867cb4cfb941747d104f765+extended windows/amd64 BuildDate=2022-05-31T08:37:12Z VendorInfo=gohugoio
| EN
-------------------+-----
Pages | 20
Paginator pages | 0
Non-page files | 0
Static files | 0
Processed images | 0
Aliases | 2
Sitemaps | 1
Cleaned | 0
Built in 98 ms
Watching for changes in C:\Hugo\sites\Reid00.github.io.source\{archetypes,content,data,layouts,static,themes}
Watching for config changes in C:\Hugo\sites\Reid00.github.io.source\config.yaml
Environment: "development"
Serving pages from memory
Running in Fast Render Mode. For full rebuilds on change: hugo server --disableFastRender
Web Server is available at http://localhost:1313/ (bind address 127.0.0.1)
Press Ctrl+C to stop
|
效果如下:

部署到GitHub pages#
两种方式:
hugo 命令后生成public 文件夹,将public 单独push 到.github.io 仓库- 是将整个项目部署到.github.io.source 仓库,通过github action 自动部署
SSH#
这里需要重新生成一对密钥,使用之前用来配置过 Github 的密钥不能在这里使用啦,会报错提示已经被使用过啦。
1
2
3
4
5
6
7
8
9
10
| ssh-keygen -t rsa - -C "$(git config user.email)"
# 注意:这次不要直接回车,以免覆盖之前生成的
# 确认秘钥的保存路径(如果不需要改路径则直接回车);如果已经有秘钥文件,则需要换一个路径,避免覆盖掉,如我更改之后的路径为 /home/kearney/.ssh_action/id_rsa;
# 创建密码(如果不需要密码则直接回车);
# 确认密码(如果不需要密码则直接回车),生成结束;
# 查看公钥,路径需要改为你上面的设置
cat ~/.ssh_action/id_rsa.pub
# 查看私钥
cat ~/.ssh_action/id_rsa
|
Page 仓库 Reid00/ Reid00.github.io 中,点击 Setting - Deploy keys - Add deploy key,名称随意,粘贴进去刚生成的公钥,务必勾选 Allow write access 。点击保存。
源码仓库 Reid00/ Reid00.github.io.source 。点击 Setting - Secrets - New repo secrets ,名称务必设置为 ACTIONS_DEPLOY_KEY, 添加刚刚生成的私钥(id_rsa),变量名称是要在 action 的配置文件中使用的,因此要保持统一,可修改为别的名称,但要相同即可。
将项目hello-hugo 推送到 Reid00.github.io.source 仓库#
讲到这里突然发现还没有讲,把项目推送到github,方式如下:
此处本质就是用git 创建项目,推送到Github 如果出现错误,请自行搜索排查。
1
2
3
4
5
6
| git init
git remote add origin git@github.com:Reid00/Reid00.github.io.source.git
git add .
git commit -m 'init'
git push -f --set-upstream origin master
|
配置 Github Action#
在源码跟目录下新建 /.github/workflows/github-actions-demo.yml,内容如下,需要更改的地方为 Page 仓库、分支。
yml push 上去之后,再更新下文章,直接 push 源码,后台就会自动生成并发布到 Page 仓库。
测试良好,但也发现了一些问题,本人对 Action 了解不够深,猜测是 yml 没抄好。一个问题是源码仓库中 public 指向的网页仓库的 commit 标志未更新,但实际上对于的网页已经更新到 Page 中了,不过这不影响网页发布,暂不考虑解决这个问题。
其次是我的 submodule 主题中有个在 gitee 中,需要移回到 github 并设置,还有 public 也是,那么干脆就将这些 submodule 取消掉的了,直接并入源码仓库,也不要考虑啥 commit 指针标记了。
遇到问题#
网站css 错乱
参考此处 Fixing the CSS Integrity Digest Error in Hugo
windows git add 的时候LF 会用CRLF 替换,需要对git 进行设置。
参考文章第二种方法解决
单独 将public push 到github pages 仓库可以用,但是Github Action 推送后,Github pages 主页变成了index.xml 不是index.html,不可用?
原因:public 里面又github pages 的.git 文件夹,会导致workflow那边submodules 出错。
- 删除.git 文件夹
- 在与config.yaml 同级目录下添加.gitmodules
1
2
3
4
5
6
7
8
| C:.
│ .gitmodules
│ config.yaml
│ README.md
[submodule "themes/PaperMod"]
path = themes/PaperMod
url = https://github.com/adityatelange/hugo-PaperMod.git
|


